This Enfocus PitStop command allows us to change the colours of a document to some other colours of our choice. It is a very powerful but complex command that may require some planning in its implementation.
Analyzing the existing colours
![]()
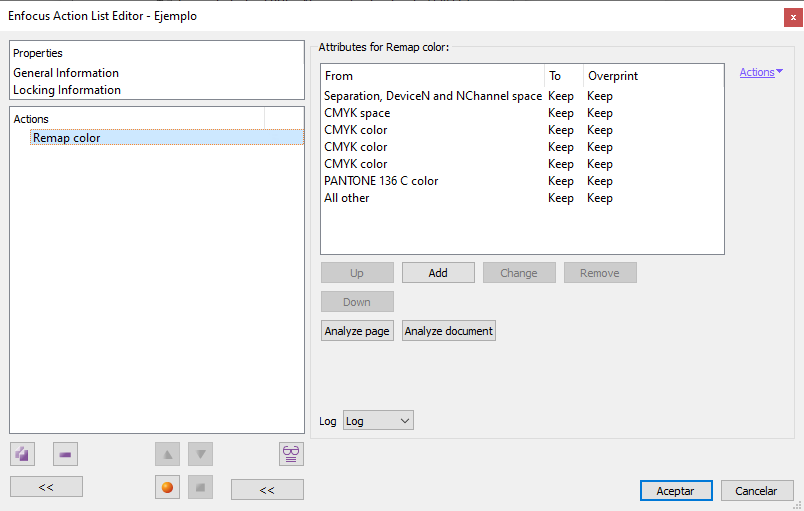
Normally, to apply the order, the most practical way is to see which are the existing colours in the area we want to modify. For this, there are two options: "Analyze page" and "Analyze document". By choosing one of them, PitStop examines what has been chosen and fills in a list with the results so that the user can decide what to do with each of the elements in the list.
Warning: It is not mandatory to use these two options but it is highly recommended, at least as a starting point, as it will help us to apply to a document the most appropriate colour change strategy.
As a matter of fact, in documents seemingly simple, unexpected colours or colour modes may appear after analysis; colours whose existence would not seem obvious.
The list is divided into three columns: "From", "To" and "Overprint". Each line is made up of these three columns and thus configures a colour change command.
- "
From": It sets the source colour(s), those that will be altered by the command line. - "
To": It defines the target colours, which will be the result of the change. - "
Overprint": It sets what should happen with the overprinting of the affected colours, whether they should overprint or not, or left as they are.
The list is a stack of commands that forms a single more complex command, where each line is an instruction that is deal with firstly; that is, the topmost lines are applied before; the bottommost lines are applied afterwards.
Warning: It is essential to understand that this sorting does not mean that the instructions are executed sequentially. The batch is a single command that is applied all at once. Therefore, no matter how much we plan, if what we want to do involves sequential colour changes, we should call the remapping action two or more times or use a different action after applying it.
For example, if we want to change all the DeviceCMYK colours to greyscale except for whatever it is in a DeviceCMYK red hue "0/100/90/0", the appropriate sorting of instructions in one remap command would be:
- "
From: Color DeviceCMYK 0/100/90/0 To: Keep". - "
From Color Space DeviceCMYK To: Color SpaceDeviceGray".
In that order because first we tell PitStop to keep ("Keep") that shade of red and then to change anything that is in DeviceCMYK to greyscale. Would be tell that the other way around, the keeping instruction would be considered after the one that changes everything, so it would have no effect.
The logic that follows from this is that we should always place the individual colors or hues (specific colours) at the top of the stack and deal after with the more general (colour spaces), at the bottom. In this way, we first apply the exceptions and then the general rules.
For example, if we wanted to convert everything to greyscale except for a specific colour, we would first protect that colour by telling PitStop to keep it and then change everything to greyscale. That way, the chosen colour would be safe from change.
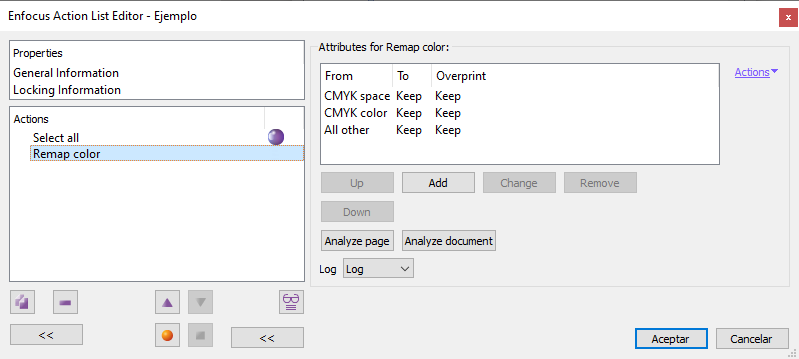
Warning: In this command there is a special source colour or group of colours, "All other", which means "All colours... that have not been affected by a preceding instruction". It is therefore usual to assign to this group the option "Keep" (i.e. do not change).
This line works as a safety net so that PitStop knows what to do with those colours that are not explicitly designated for modification. Its presence is desirable but not mkandatory.
This "All other" instruction only appears the first time we call the "Remap colour" action, so if we delete it, the only way to add it back to the list is to rempove the remap command and add it again.

There are five options for modifying or adding hues to the stack of colours.
- Up: The instruction is moved further up the list.
- Down: The colour moves down the list.
- Remove: The hue is removed from the list.
- Change: A dialogue box to change the remapping operation is opened, as we describe below.
- Add: The same dialogue box is opened to create a new change, starting from scratch. If the analysis of the document hints some remappings might be too complex, starting from scratch could be simpler.
Choosing source and destination colours
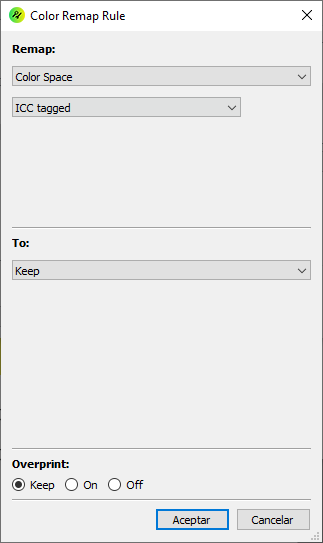
If we select a line from the list and click on the "Change" button, a dialogue box will appear, allowing us to tell PitStop how it must change (or "Remap") a colour value "From" a source parameters "To" another value, which may be a completely different colour space. The key to the operation is knowing how to choose the source ("From") and destination ("To") colours.
The source colour
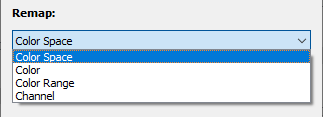
As source possibilities ("Remap [from]"), there are four sections: "Colour space", "Colour", "Colour range" and "Channel". Each of them changes the dialogue box with different options, described below:
1. Colour space
If we choose this option, all the colours corresponding to the chosen colour definition mode (that is, a colour space) will be changed to whatever we have chosen as the target colour in the "To" (destination) section at the end of the line.
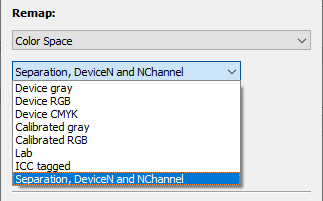
This option allows you to choose between nine "colour spaces", that is ways of defining colour within a PDF. Not all possible colour colour spaces are included (for example, we cannot choose a "pattern" colour space). Those included are: "DeviceGray", "DeviceRGB", "DeviceCMYK", "Calibrated Grey", "Calibrated RGB", "Lab", "ICC tagged" and "Separation, DeviceN and NChannel".
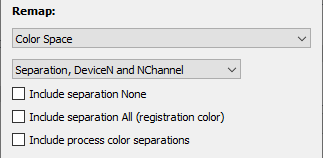
Besides, there are three checkboxes to choose three special options:
- "
Include separation None": With this option the special reserved colour "None" is added to the colour remapping of the colour spaces of "Separation" type. This reserved colour is used for elements that cannot paint in any colour separation. - "
Include Separation All (registration colour)": With this option the special reserved colour "All" is added to the colour remapping of the colour spaces of "Separation" type. This reserved colour (called as well "Registration") is used for elements that must paint in every colour separation defined. - "
Include process colour separations" By checking this option, all colour data present in one of the four process separations (Cyan, Magenta, Yellow and Black) are selected.
This option can be applied to all objects in a PDF (including pictures and other bitmap objects).
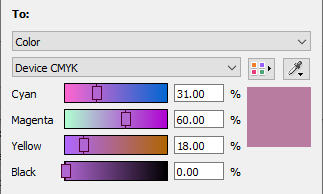
2. Colour
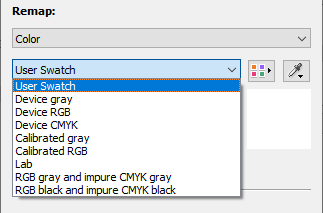
If we choose this option, what is chosen are specific colors. Their composition is done with names or numbers (for the amounts of colorants). Though the choice is made on the basis of colour spaces, a very specific amount of colorants must be done as well in each of the nine colour spaces or colour modes available in this option: "User swatch", "DeviceGray", "DeviceRGB", "DeviceCMYK". "Calibrated Grey", "Calibrated RGB", "Lab", "RGB Gray and Impure CMYK Gray" and "RGB Black and Impure CMYK Black".
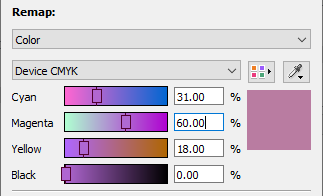
For example, if we choose the option "DeviceCMYK", we can choose a hue with the percentages of the four CMYK colorants, as shown in the image above.
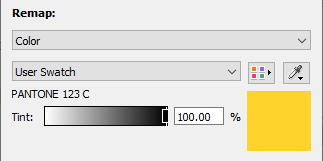
the "User swatch" option refers to a colour present in an element we have already selected and whose values we pass by capturing them with the eyedropper. It can be any of the other eight supported colour spaces. Its advantage is that we don't have to worry about what kind of colour it is, we just need to know that we want to change it, select it and with the eyedropper, capture its values.
Although the options "RGB Gray and Impure CMYK Gray" and "RGB Black and Impure CMYK Black" should in principle allow the selection of grey and black colours in CMYK with multi-ink composition, their operation is more unpredictable than their name suggests and it is not uncommon for them to miss shades that should change.
They are a good safety net, but they should not be relied upon to correct all inappropriate shades. That is why it is advisable to supplement their operation with the use of instructions that select by "colour range" or "colour space".
This option cannot be applied to pictures and other bitmap objects.
3. Colour range
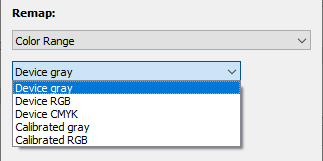
If we select this option, we can define a range of hues in percentages from "0%" (no colorant) to "100%" (maximum value). Any colour within the specified range of values will be affected. This instruction allows us to choose colour ranges in five types of colour definitions, each with its corresponding set of colorants ("DeviceGray", "DeviceRGB", "DeviceCMYK", "Calibrated Gray" and "Calibrated RGB").
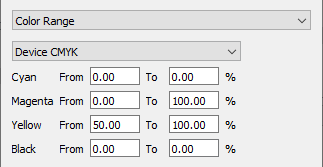
For example, if we choose a CMYK colour range like the one above, the instruction will affect all shades that have between "0%" and "100%" magenta and between "50%" and "100%" yellow, in any amount of both (basically orange and red hues in CMYK).
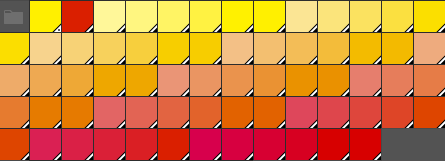
In such a selection, all these CMYK colour patches would be affected by the instruction.
Warning: the selection of hues with of "Color range" is very powerful, but this power limits its application somewhat, since if we go too far we will select colours that we do not wish to alter. In many cases, the solution is to apply it incrementally in successive instruction lines which, as we have seen, will be taken into account in that processing order.
For example, if we want to change black text that is in impure black to K-only black and the "Colour - RGB black and impure CMYK black" option above does not work well, we can add the following sequence of instructions (refineable at will by adding more lines):
Colour range - DeviceCMYK: C: 10 a 100 / M: 10 a 100 / Y: 10 a 100 / K: 80 a 100Colour range - DeviceCMYK: C: 80 a 100 / M: 80 a 100 / Y: 80 a 100 / K: 50 a 100Colour range - DeviceCMYK: C: 90 a 100 / M: 90 a 100 / Y: 90 a 100 / K: 0 a 100- etc.
All with destination "To: Colour - DeviceCMYK: 0/0/0/100".
This option cannot be applied to pictures and other bitmap objects.
4. Channel
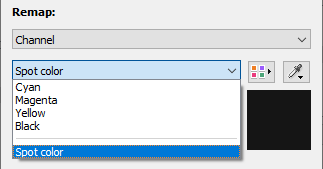
If we choose this last option, we will be aiming the information from one of the four-colour primary colour separations ("Cyan", "Magenta", "Yellow" and "Black", here called "Channels") or from a spot colour ("Spot colour").
Warning: If we want to select an spot ink present the document, the quickest way is to have an element with that colour selected and capture its values with the eyedropper.
We should take into account that with the "Colour picker" we can choose any spot colour from the standard catalogues, even those that do not exist in the document. If we do so, this command line will have no effect (neither good nor bad).
The target colour space
In the target or destination colour (the one to which the source colour is converted), ("To:"), there are three options: "Keep", "Colour space" and "Colour". Each of them changes the dialogue box with different possibilities. There is a fourth option, "Channel", which only appears if we have chosen a channel (colour separation) as the source colour space.
Warning: Pixel objects (images) only change if the target chosen is "Color space". They do not respond to the "Color" or "Channel" options. So, if we want to convert an image to a spot colour, we must choose "Colour space - Separation" and select the spot colour we want to apply.
The four options are very similar to those of the same name in the source colour space, but there are a few small differences that are interesting to note.
1. Keep
As we have seen above, this option ("Keep") tells PitStop that whatever has been chosen as the source colour should not be varied, even if there is a broader instruction below that would affect it.
2. Colour space
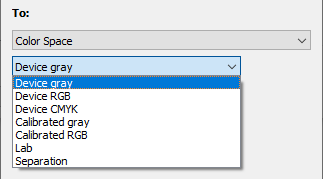
When this option is selected, the target colour(s) will be converted to the colour space type chosen from the seven available: "DeviceGray", "DeviceRGB", "DeviceCMYK", "Calibrated Gray", "Calibrated RGB", "Lab", and "Separation".
The conversion will be done quite likely using the values and colour profiles active in the colour management at that moment, so in this case it is convenient to keep this in mind and modify it so that the results fits to our needs.
3. Colour
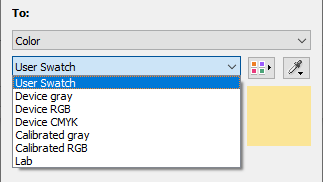
In this case, the source colour will be converted to a single specific colour that we must specify in percentages of colorants from one of the seven options available as colour modes: "User swatch", "DeviceGray", "DeviceRGB", "DeviceCMYK", "Calibrated gray", "Calibrated RGB" and "Lab".
For example, if we choose the option "DeviceCMYK", we can set a hue with the percentages of the four process colours as the target for the conversion, as shown in the image above.
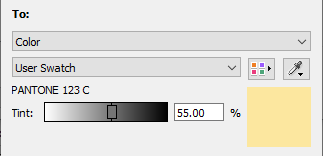
As when choosing the sourde, the "User swatch" option refers to a colour present in an element we have selected and whose values we pass by capturing them with the eyedropper. This can be any of the other six supported colour spaces. Its advantage is that we don't have to worry about what kind of colour it is, we just need to know that we want to change it, select it and with the eyedropper, capture its values.
4. Channel
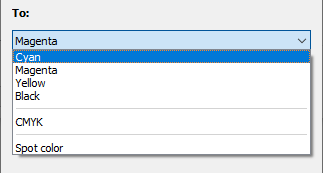
This option is only available if the "Channel" option has been selected as the source colour space.
If we select it, the target colour will pass all its information to one of the four process colour separations ("Cyan", "Magenta", "Yellow" and "Black", here called "Channels") or a "spot colour".
As indicated above, if we want to select an ink directly from the document, the quickest way is to have an element with that colour selected and capture its values with the eyedropper.
Warning: We should take into account that with the "Colour picker" we can choose any spot colour from the standard catalogues, even those that do not exist in the document. If we do so, this command line will have no effect (neither good nor bad).
Overprinting
![]()
For all the instructions to change a colour or colour space, there is a triple option to enable "On", disable "Off" or "Keep (as is)" the overprinting of the colours in question.
As a matter of fact, here we may choose not to change anything in a colour or colour space and alter only its overprinting.
[© Gustavo Sánchez Muñoz, 2026] Gustavo Sánchez Muñoz (also identified as Gusgsm) is the author of the content of this page. Its graphic and written content can be shared, copied and redistributed in whole or in part without the express permission of its author with the only condition that it cannot be used for directly commercial purposes (that is: It cannot be resold, but it can form part as reasonable quotations in commercial works) and the legal terms of any derivative works must be the same as those expressed in this statement. The citation of the source with reference to this site and its author is not mandatory, although it is always appreciated.