"Overprinting is when one ink prints over another ink that has already printed. The opposite phenomenon is "knocking out", which is when an ink forces leaving a gap to be printed alone where another ink should be printed too.
Both concepts are simple, but understanding how both are applied in prepress is not so self-evident.
Stacking order rules
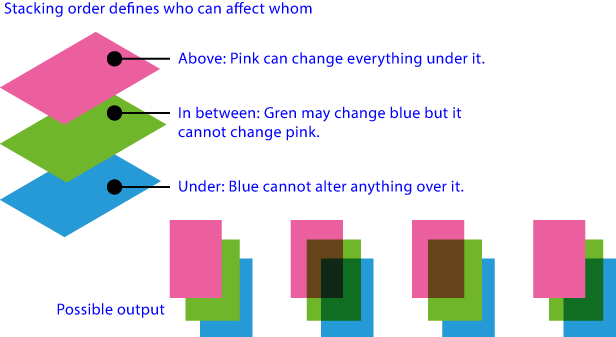
In the graphic design software, overprinting or knocking out depends primarily of the stacking order of an object in relation to the others: Only the topmost objects can knock out or overprint the other ones (they are active). Those underneath cannot choose (they are passive).
When an object has a colour formed by of two inks, both are printed, one on top of the other, to build up a colour. Were not for this overprinting, the desired colour would not be achieved.
However, when an object has a colour composed of one or more inks and is placed on top of another object, it all depends on which inks (note "inks", not "colours") the topmost object has:
Four-colour (CMYK) overprinting
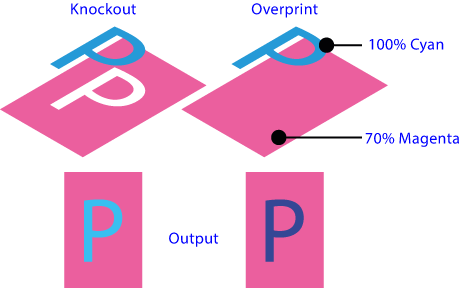
If the inks of the elements are process (CMYK) inks, the default is that the inks of the topmost object will knockout (make a gap) overt those of the underlying object. Visually, it is as if the upper object "covers" the lower one.
However, If the designer chooses so, overprinting the topmost can be forced and the knockout will be overidden. Ideally, the appearance should be as if the lower object is seen through the topmost one, not covering it wholly.
Overprinting of an ink over itself
If the topmost and the underlying objects share one ink (or more) and we force the overprinting of the upper element, the matter starts to get a bit difficult: The rule is that the percentage of the same ink of the top most object always predominates (even if its value is lower); that is: if the upper object has, among other things, 20% magenta and the bottom object has 50% magenta, what will be overprinted will be 20% magenta (not 50%, and much less 70%). Obviously this will produce a change of appearance in the final colour.
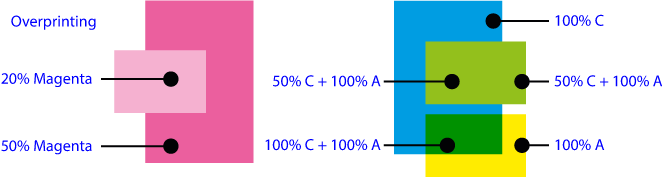
This can be summarized with this rule: "Any ink is always opaque over itself"; that is "no ink overprints over itself". That is why the value in that ink of the upper object always predominates, even if it is a smaller percentage than the one below it. This rule also applies to spot inks (see image below).
Warning: As this behaviour is not always intuitive and some programs or users may have problems to display and understand this behaviour, in case of doubt it is advisable to preview the separations and browse the ink percentages in critical areas.
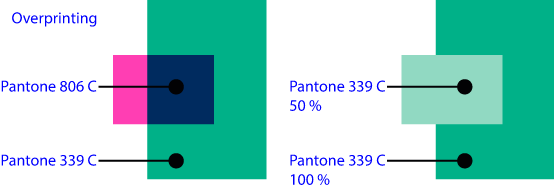
If the topmost object has CMYK inks and the underlying one has a spot inks, the CMYK ones will knock out the spot inks. The same is true the other way round (spot ink over process inks). This is so unless we specifically ask fot the topmost object to over print. If so, the overprinting should be successful inbot cases.
Overprinting 0% inks: Mode 0 and Mode 1
To overcome the limitations of digital overprinting, two overprinting "modes" or algorithms were developed. The original is "Mode 0". Later "Mode 1" (called sometimes "Illustrator Mode"):
Mode 0
If a topmost object colour is made out of process inks (CMYK), some or all of them may have a value of 0%. Then, the expected printing behaviour is that they will knock out the inks in the objects under them (unless they are spot inks). They will be opaque, preventing the printing of the underlying inks if they are CMYK inks. This is logical, because if we want to cover things with a "white" (or "paper-coloured") object, that is the behaviour that will allow it. Thanks to that, we can place white text over dark backgrounds.
As we said above, this behaviour means that, by default, no process (or greyscale) colour is overprinted on another process (or greyscale) colour, even if they share no inks in its composition. The main reason is that all of them have some of the four inks, at least at "0%".
This behaviour is the original default mode of most programmes and is often referred to as "
Mode 0" overprinting.
This translates as follows: In "Mode 0", four-colour or greyscale inks do not overprint over their pairs, but they overprint over spot inks (or vice versa).Mode 1
There is another way of overprinting "0% inks", which is that they do not knock out. They overprint; that is: To the the software a 0% ink is af it it wasn't there, so it cannot prevent the printing of other inks at the same place.
This behaviour is called "
Mode 1" or "Illustrator (overprint) mode" (because it started to be used in association with Illustrator). It appeared in the days of PostScript, before the existence of blending modes as a way to overcome the limitations of the previous "Mode 0".Although with "
Mode 1" it is possible to overprint some process (CMYK) inks on top of others, the final result can sometimes be unexpected because the rule that an ink does not overprint on top of itself is maintained. This means that, as the common components still cancel out their equals but the 0% values do not, the difference between the expected and the obtained colours can be huge.
An example
Here we have an example of the four basic possibilities. Here we have a topmost greenish square and an underlying purple one. How will they print? The fill of both is in CMYK mode, so everything explained above may apply:
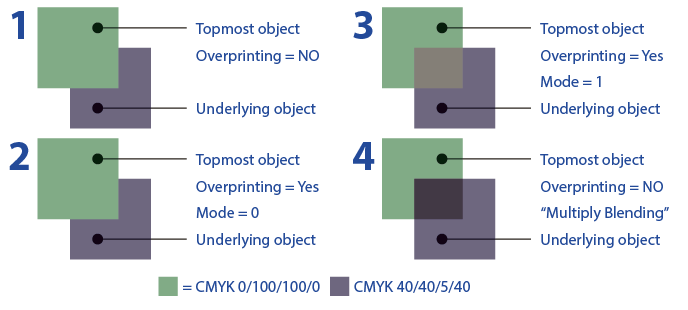
- The simplest situation is no overprinting, (case 1). Here the upper object covers the lower object.
- In the 2nd case the result is the same, because even if there is overprinting, as both objects are CMYK and it is "
Mode 0", the overprinting has no effect and the topmost object also knocks out. - In the 3rd (Overprinting, "Mode 1") there is overprinting, but the result is visually strange. The reason is that the top 5% Magenta rules over the bottom 40% Magenta and this causes a tonal shift.
- Case 4 has nothing to do with overprinting. It is the result of the top object having a transparency in "
multiply" blending mode. We added it because it is probably what the user visually expected when applying "overprinting". Now, we understand that there has been no error, that everything has worked correctly and that, even so, it is not the visually expected result.
Nowadays most design programs apply the overprinting modes automatically, leaving the user no choice as to which mode will be used. PitStop does allow that choice.
Black overprinting
Black ink is usually expected to overprint most of the time and many programs have that behaviour by default or they allow to set it so in their preferences (that is the case of Adobe InDesign, for example, but only when it is applied at 100% and the swatch is called "[Black]").
However, we should neither take this for granted nor that this is the behaviour that the designer intended. It is therefore a good idea to examine the separations for any unexpected behaviour.
Errors in the composition of black objects and black ink overprinting are one of the main problems in prepress.
Transparencies and overprinting
When Adobe introduced blending modes (which have been slowly incorporated into the PDF format (but not into the PostScript language, which has long since ceased development), the situation became both more complex and simpler, and it is the cause of many of the problems in some PDF documents for printing.
If the user mixes transparencies, overprinting and spot colours, it is rather common the appearance of unwanted colour and ink conversions (for instance: Areas that should be spot colours are converted to CMYK when using the transparency flattener).
Therefore, the mixing of transparencies and spot inks must be handled with great care and, if overprinting is involved, it must be examined very carefully.
[© Gustavo Sánchez Muñoz, 2026] Gustavo Sánchez Muñoz (also identified as Gusgsm) is the author of the content of this page. Its graphic and written content can be shared, copied and redistributed in whole or in part without the express permission of its author with the only condition that it cannot be used for directly commercial purposes (that is: It cannot be resold, but it can form part as reasonable quotations in commercial works) and the legal terms of any derivative works must be the same as those expressed in this statement. The citation of the source with reference to this site and its author is not mandatory, although it is always appreciated.