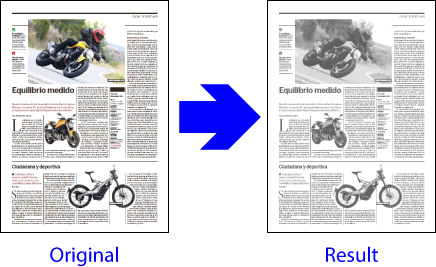
This is a very simple example of how to create an action list in PitStop to understand how the action list "Editor" works. The action list created will change the entire content of a PDF to greyscale (regardless of the original colour mode).
To start, In Acrobat, we open a PDF so that, when changing it, we can see how the new action works.
Warning: This document must have features that allow us to check that the list works all right and it does not do anything we don't want it to do. This step is not essential; it is possible to create an action without any document open, but until we get used to work with PitStop, it is advisable to create actions this way.
We open the PitStop action lists window ("PitStop Pro - Action lists" menu). Then we place the cursor on the "Local" group icon to create the list there.
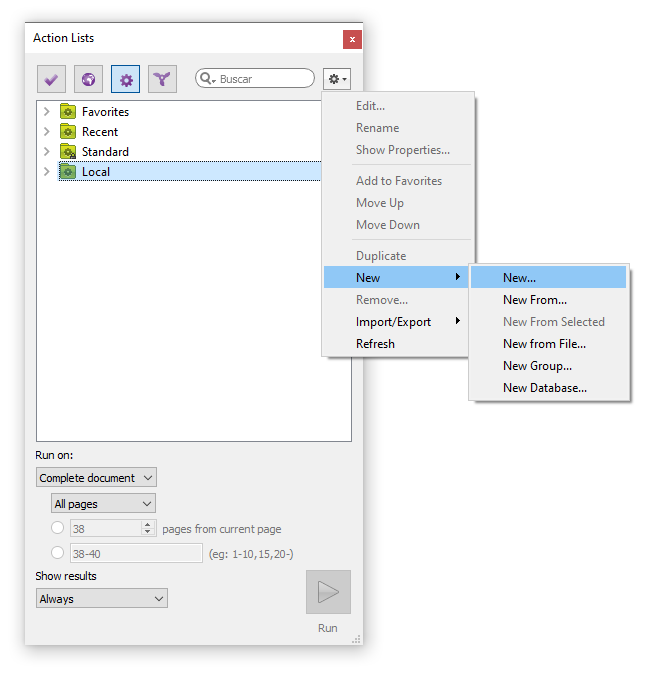
With the right button of the mouse, we choose the option "New - New" to create a new action from scratch.
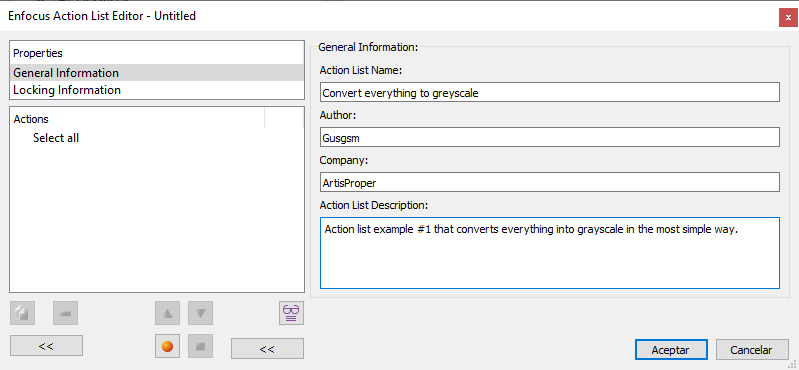
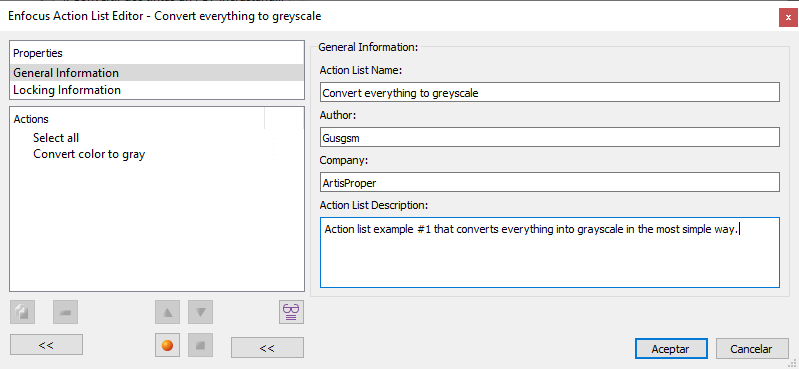
In the "Action list name" section, we give it a meaningful name; for example: "Convert everything to greyscale". If we want, we identify the "Author" or the "Company". In the "Action list description" area, we can add a brief resume of what the action does.
Warning: In the case of very basic lists, this may seem unnecessary, but when we have several a lot of similar actions and some of them are complex with slight differences, spending five minutes creating them can save us a lot of time later on.
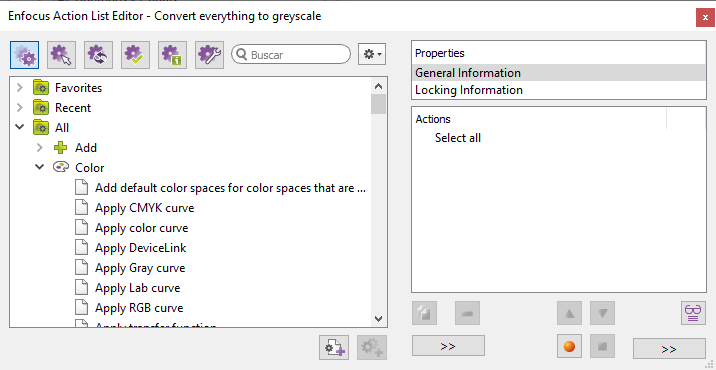
Next, we expand the left part of the action list "Editor" window to display the side where the available actions are, to choose and add some to the list we are editing.
To add a command to an action list, we look for it in this left part and, once it has been located, we drag it to the centre or double-click on the name (the result is the same).
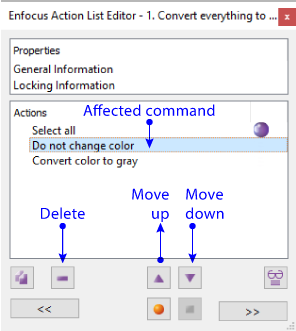
We must remember that the commands work as a stack: those at the top are executed before those at the bottom. If we want to change the order of execution, we only have to place the cursor over the command in question and click on the up or down icons. If we want to delete an order, we place the cursor over its name and click on the delete icon.
Once we have finished or we want just to save whart we have done, we just click on the "OK" button (if we don't do that, all the work done in the list will be lost).
The normal processing order requires that we first select something to then change it. The reason for this is that selections allow us to delimit which elements are affected by a command. In action lists that contain more than one change or check command, it is common to use more than one selection-change/check sequence.
So, in this example, the first thing we will do is to select what we want to change. In fact, in most modern versions, when an action list is created from scratch, the "Select all" command is always included, to avoid inconsistencies.
In this case, as we want to change everything in the PDF, we leave that general selection command.
Next, we look for a change command that allows us to change everything to greyscale colour mode.
Click on the "Changes" icon (to delimit the available commands) and we look for the "Colour" section. There, we locate the commands that change colour spaces. If we don't know the commands yet, we double click on the name of the most likely candidates to add them to the list. In this case they are "Change colour" and "Convert colour".
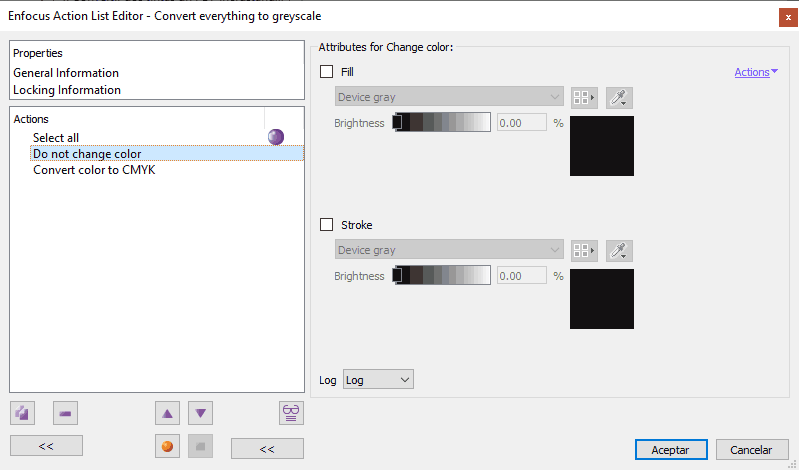
When we examine each command, the options for each one (which are shown in the right-hand zone), we can see that the command that does what we want is "Convert colour", not "Change colour".
Now we delete the unwanted command by clicking over its name and then pressing the "Delete" key or the icon explained above.
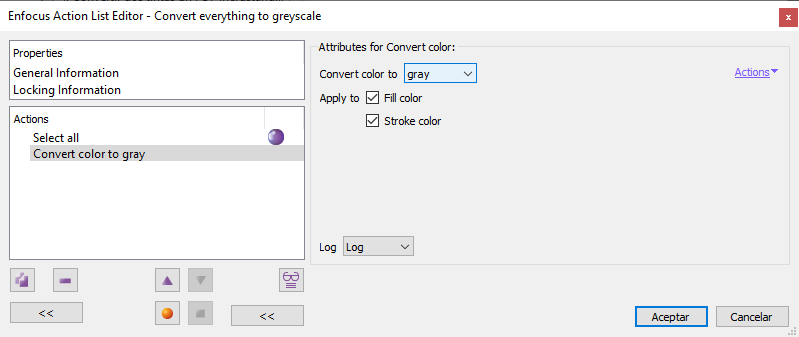
Next we modify the command options to set what those we want. In our case it is converting to greyscale, so we choose "Convert colour to: Grey". We leave the options "Fill colour" and "Stroke colour" ckecked on.
To see what the list does in each case, in the "Log" area, we set it to "Log". This means that PitStop will keep a record of the changes it makes. For the moment, as we are learning, we are interested that this happens always. In a production environtment it might not be the case.
We click "OK" and the order will be saved in our system, available for its use.
The next step is to test the list of actions to check wether it does everything we want and nothing we don't (which can happen more easily than it seems until we understand the logic of PitStop).
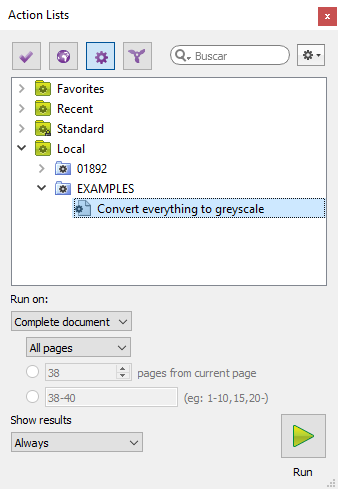
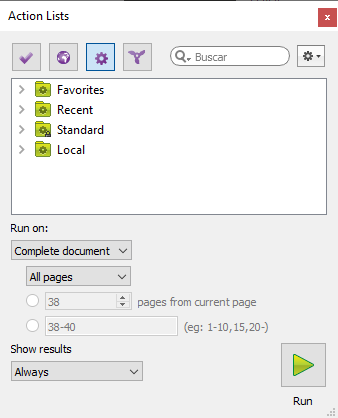
With a document open (at least in the Pro version of PitStop, the Server one works differently), and the "Action List" window open, we place the cursor over the name of the list of actions we want to execute ("Convert everything to Greyscale"). Then we check that the "Run in" option is set to "Complete document" / "All pages". We check as well that "Show results" is set to "Always" (so that we see what happens, whatever it is). Now we click "Run".
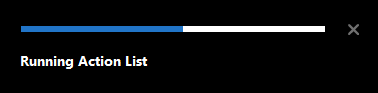
If the process takes a while, we will see a progress bar that will disappear when the action has been executed.
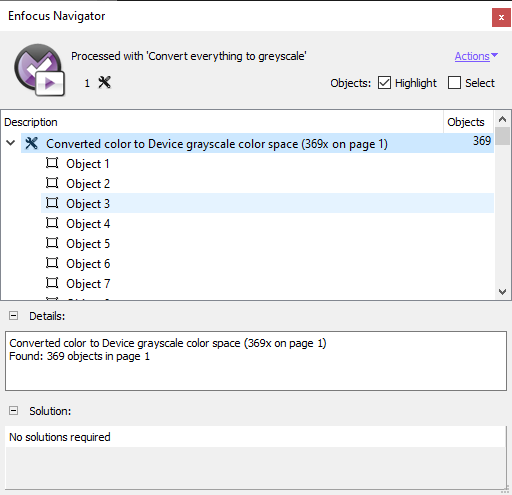
Now, if the action has changed anything, PitStop's "Navigator" will pop up with the information about the changes made and the objects affected.
If we want to see what has changed in a given object, we just click on the name of the object in the browser window and PitStop will highlight it on the screen, adding a brief information about what has been done to it in the "Solution" zone.
If we are satisfied with the results, we have finished our first action list.
[© Gustavo Sánchez Muñoz, 2026] Gustavo Sánchez Muñoz (also identified as Gusgsm) is the author of the content of this page. Its graphic and written content can be shared, copied and redistributed in whole or in part without the express permission of its author with the only condition that it cannot be used for directly commercial purposes (that is: It cannot be resold, but it can form part as reasonable quotations in commercial works) and the legal terms of any derivative works must be the same as those expressed in this statement. The citation of the source with reference to this site and its author is not mandatory, although it is always appreciated.