This command allows us to correct the lack of bleed in the pages to which it is applied. If no prior selection of pages has been made, the command will affect all pages within its range.
When printing with colours and images just up to the edge of the page, objects that are at or very close to that edge must be extended a few millimetres so that when the page is trimmed they do not leave unsightly white borders. This is called "bleed". The usual value in commercial printing is 3 mm.
In PDF format the bleed is the area between the TrimBox and the BleedBox; this cannot be chosen. What this PitStop command does is to extend the elements from one box (TrimBox) to the other (BleedBox) so that a page is bleeded properly.
Warning: Before applying the command to an action list, it is essential that the MediaBox, TrimBox and BleedBox are set. The incorrect definition of one of them (or its absence) will the command will not do anything or it will work worongly.
The amount of bleed applied
The amount of the bleed we want to apply is not a parameter that we can define straight away anywhere in the order. What PitStop does is to extend the graphic material from the TrimBox to the BleedBox, i.e. if we want, for whatever reason, to have a bleed of 12 mm (which is unrealistic), what we have to do is to define a TrimBox and a BleedBox that are 12 mm apart.
If one of the two boxes is missing or there is no size difference between them, the command will do nothing.
Where to add bleed
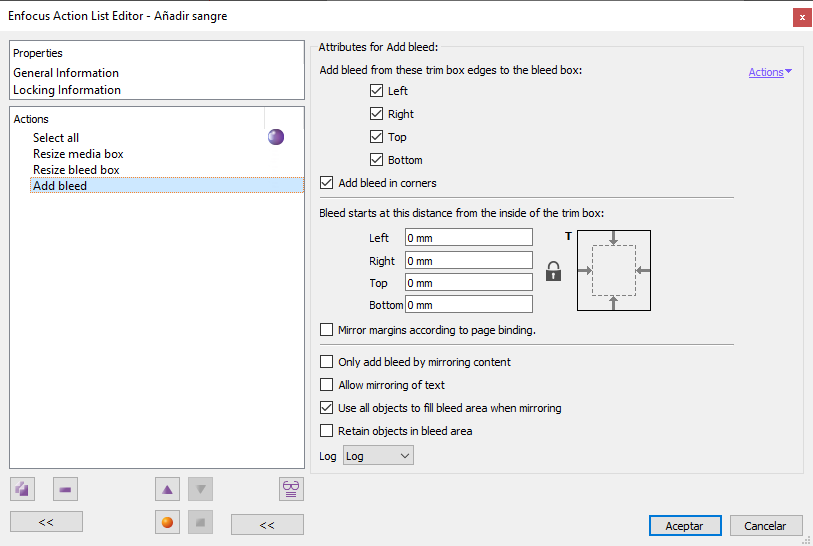
We can choose where to do the operation in the area "Add bleed from these trim box edges to the bleed box". There are five options: The four sides ("Left", "Right", "Top" and "Bottom") and the corners. Bleed will extend only where marked.
If we check the option "Add bleed in corners", the extension of elements is not only done on the sides, but the corresponding corners are included. This option does not apply unless two sides meet in a corner.
Note: The extensions are added as new, independent boxes. The original objects remain untouched.
Where to start the bleed from
"Bleed starts at this distance from the inside of the trim box": This is the minimum distance from which PitStop Se should extend objects to the bleed. That is to say, if we indicate "2 mm", any object that is 2 mm or less from the edge of the page will suffer the effect of the action.
Warning: If the page has the right size and the problem is just that the creator had left the image or colour elements right at the edge of the page, without extending them 3 mm beyond it (probably the most common mistake made by novice graphic designers), the value entered in this section should be "0 mm".
On the other hand, if the image elements did not go all the way to the edge but fell a bit short (say, for example, "4 mm."), the measure to enter in this section is this missing bit (and a tad more so that they do not leave any white line; say, in this example something like, "4.5 mm.").
Reflecting margins (only for multipage facing pages PDFs)
What the option "Mirror margins according to page binding" does is changin the "left" and "right" sides into "Outer" and "Inner".
Note: This option only makes sense for multi-page documents with facing pages. In such cases, PitStop always considers the first page of such a PDF to be like the front cover of a book: Odd numbered and having spine or gutter on the left side ("Inside"); the other ones alternate.
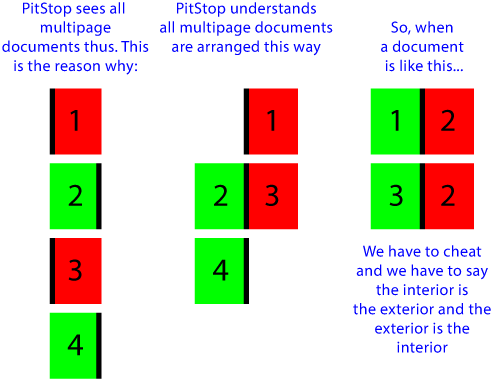
But, if if the document is one in which the first page is the left-handed page of a spread (even numbered, with the gutter on the right, which is a very common practice among designers), then PitStop will be treating the inside and outside margins in the wrong sense.
In such cases, the trick is to cheat PitStop by telling it that the outer side is the inner side and vice versa.
How to extend the elements
PitStop automatically applies some procedures to extend the required colours and graphic or text elements, but we can change this behaviour with the following options.
- "
Only add bleed by mirroring content": If this option is selected, PitStop will only extend objects by applying the mirroring technique. This procedure is less intensive and produces smaller files, but it's more limited. - "
Allow mirroring of text": If this option is checked, when extending missing elements, the mirroring technique is also applied to the texts placed in the affected area. If this option is not selected, texts there will not be extended or mirrored. As a general rule, in areas with small texts near the edges, it may be better not to activate it. - "
Use all objects to fill bleed area when mirroring": If this option is not checked, mirroring will only be applied to objects that touch the TrimBox and only on the side they touch. If selected, everything that falls within the threshold we have chosen above will be included. - "Retain objects in bleed area": If this option is not checked, any object in the area affected by the extension (up to the BleedBox) is deleted (this is the default behaviour). If checked, this objects are kept.
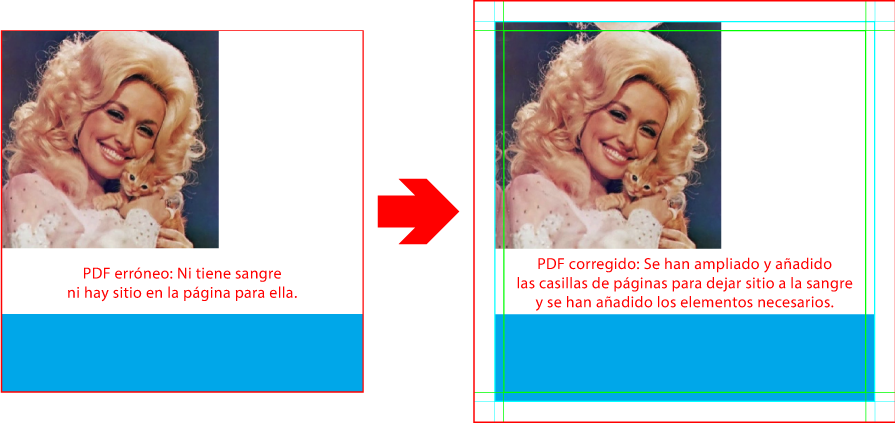
An example
To facilitate the understanding of this command, let's assume a job in which the pages have the final trim size but they have no bleed (a very common mistake). If we simply order PitStop to bleed it, the software won't do anything, because it needs a BleedBlox to work with and there's none. But if we just add BleedBox with a previous command in the list of actions, PitStop won't do anything either, because it has no physical page space (MediaBox) to make the bleed. This means we have to give the BleedBox and the MediaBox at least the same measure. And we have to do it befor using this command.
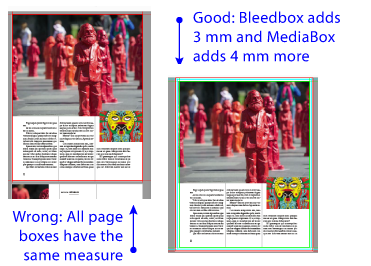
If we want the page to have crop marks, we should add a bit more space to the MediaBox to place them. So, the list of actions would be something like this:
- Add space for the BleedBox ("
3 mm." relative to the TrimBox is the standard value in commercial printing). - Add space for the MediaBox ("
4 mm." beyond the BleedBox if we want to put elements such as registration or trim marks is a good value). If we do not want that, we have to give the MediaBox at least the same size as the BleedBox. - Add the bleed to the page with this command "Add bleed".
Warning: This command is only applicable to rectangular pages, for irregular die cuts we must use the command "Add bleed around contour".
[© Gustavo Sánchez Muñoz, 2025] Gustavo Sánchez Muñoz (also identified as Gusgsm) is the author of the content of this page. Its graphic and written content can be shared, copied and redistributed in whole or in part without the express permission of its author with the only condition that it cannot be used for directly commercial purposes (that is: It cannot be resold, but it can form part as reasonable quotations in commercial works) and the legal terms of any derivative works must be the same as those expressed in this statement. The citation of the source with reference to this site and its author is not mandatory, although it is always appreciated.